Introduction
For lab 5, we were to observe conidiating Hyphomycetes, especially Pestalotia sp., Epicoccum sp., Curvularia sp., and Nigrospora sp. We were also supposed to look at the Neurospora contamination on the Mucor cups from last week, make observations of all of our corn plants, and check on our Neurospora crosses. After observing the plants for tumors, we were supposed to stain the tumors for observation under the microscope. Also, Drs. Ebbole and Shaw made a point to spot-check our blogs and give us feedback.
For lab 5, we were to observe conidiating Hyphomycetes, especially Pestalotia sp., Epicoccum sp., Curvularia sp., and Nigrospora sp. We were also supposed to look at the Neurospora contamination on the Mucor cups from last week, make observations of all of our corn plants, and check on our Neurospora crosses. After observing the plants for tumors, we were supposed to stain the tumors for observation under the microscope. Also, Drs. Ebbole and Shaw made a point to spot-check our blogs and give us feedback.
Observations of Conidiating Hyphomycetes
For the first half of lab 5, I observed different
cultures of the conidiating Hyphomycetes. I tried to be as efficient as
possible, but I was only able to observe four of these cultures (I believe
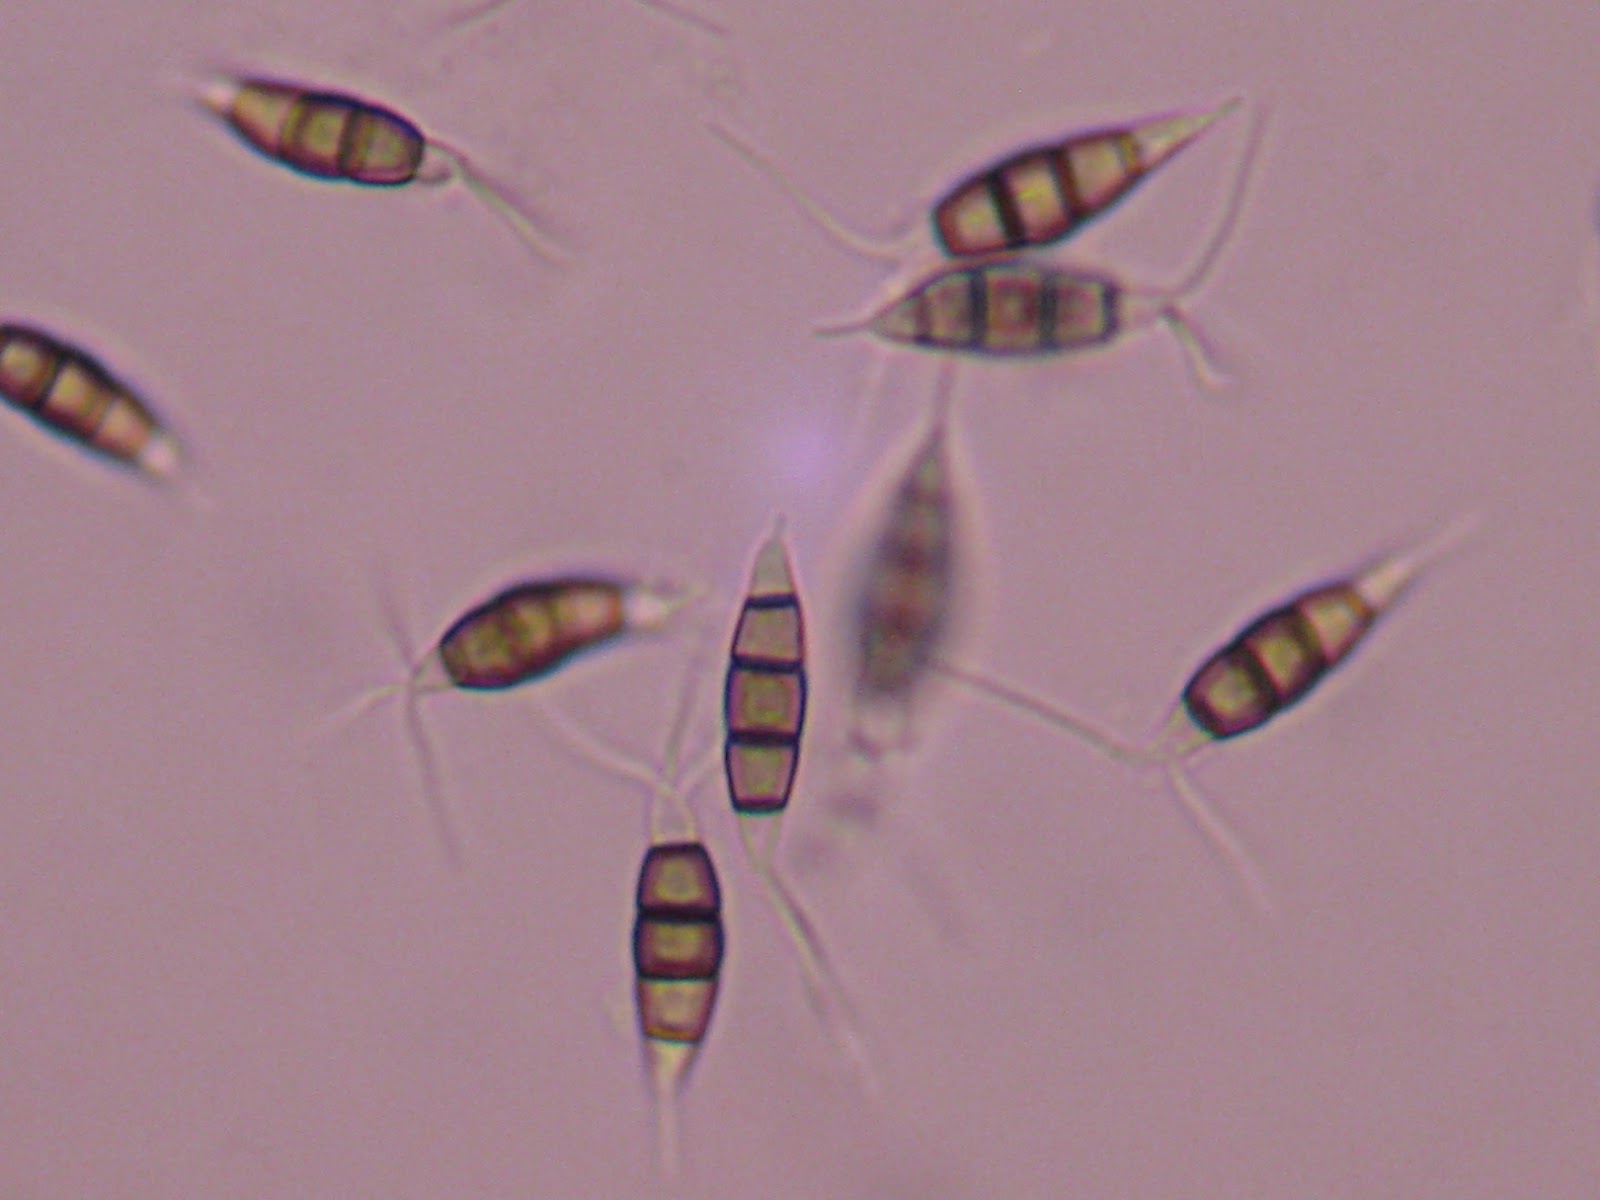
there may have been 8-10 total) during the given time. The first genus I
observed Pestalotia sp., exhibited a
distinct (memorable) morphology when compared to other fungi I have observed. Pestalotia spores were somewhat elongate, tapered at both
ends, tended to have 4 septations, and exhibited multiple appendages at one end
(Fig. 1). What I observed looked generally like what is found in the Illustrated Genera of Imperfect Fungi lab manual (Fig. 2).
 |
| Fig. 1 Pestalotia spores at 40x magnification. |
 |
| Fig. 2 Drawings of Pestalotia sp. from the Illustrated Genera of Imperfect Fungi lab manual. |
These appendages may aid in dispersal. The hyphae of this genus
were long, slender, and exhibited many very clear septations (Fig. 3). Dr.
Shaw commented that this may be because the hyphae produce arthrospores.
 |
| Fig. 3 Hyphae of Pestalotia sp. at 40x magnification. |
The second genus I observed was Curvularia sp. To me, the spores of this fungus looked like chubby
boomerangs (Fig. 4, 5). Hyphae were long and slender, but septa were not
clearly visible (Fig. 6).
 |
| Fig. 4 Spores and hyphae of Curvularia sp. at 40x magnification. |
 |
| Drawings of Curvularia sp. from Illustrated Genera of Imperfect Fungi lab manual. |
 |
| Fig. 6 Hyphae of Curvularia sp. at 40x magnification. |
The third genus I observed was Epicoccum sp. This taxon was also quite distinct, as the spores
were spherical, darkly pigmented, and contained many cells (dictyosporic)
(Figs. 7, 8). The conidiophores
were compact and exhibited short branches (Figs. 9, 10). I really like this
fungus; it’s cute.
 |
| Fig. 7 Spores of Epicoccum sp. at 40x magnification. |
 |
| Fig. 8 Drawings of Epicoccum sp. from Illustrated Genera of Imperfect Fungi lab manual. |
 |
| Fig. 9 Epicoccum sp. conidiophores at 40x magnification. |
 |
| Fig. 10 Epicoccum sp. conidiophores at 40x magnification. |
The fourth species I observed was Botrytis cinera. Conidia of this species were ovoid and clear
(hyaline) (Fig. 11), and the conidiophores were long, extremely slender, and
also clear (Fig. 12, 13). Clusters of conidia could be seen randomly along the
length of the hyphae, as well as at the apical portions.
 |
| Fig. 11 Conidia and hyphae of Botrytis cinera at 40x magnification. |
 |
| Fig. 12 Conidiophores and conidia of Botrytis cinera at 40x magnification. |
 |
| Fig. 13 Drawings of Botrytis cinera from the Illustrated Genera of Imperfect Fungi lab manual. |
Observation of Mucor rouxii Contamination
As I spent most of the lab looking at the fungi mentioned above, as well as the corn experiment which will be detailed below, I was not able to observe the Neurospora contaminated Mucor rouxii cups. I will be sure to observe this over the weekend.
As I spent most of the lab looking at the fungi mentioned above, as well as the corn experiment which will be detailed below, I was not able to observe the Neurospora contaminated Mucor rouxii cups. I will be sure to observe this over the weekend.
Observation of Corn Plants
The second portion of the lab was spent observing the previously inoculated corn plants and the plants I inoculated from last week (Fig. 14). To recap, last week we observed corn plants that had been inoculated with Ustilago maydis, a rust fungus. I also inoculated my on corn plants (see Lab 4 blog).
U. maydis causes galls to form in the plant tissue and can infect the ear of the corn, as well as the reproductive tissues of the kernels. This fungus works by causing unregulated cell growth and division, which then leads to the galls or tumors. Only one of the previously inoculated plants (SQ/Um 9/19) seemed to exhibit outward symptoms of the disease (tumors) (Fig. 15). Only one of my plants exhibited these tumors (Fig. 16), while the other inoculated and control plants had no signs of the disease (Figs. 17, 18).
 |
| Fig. 14 Previously inoculated corn plants. |
 |
| Fig. 15 SQ/Um 9/19 corn plant exhibiting disease symptoms of tumors. |
 |
| Fig. 16 One of my corn plants inoculated with 0.5 mL Ustilago maydis exhibiting tumors. |
 |
| Fig. 17 My mutant plant without any signs of disease. |
 |
| Fig. 18 One of my control corn plants without any signs of disease. |
Staining of Tumors
After observing the plants, we needed to stain the tumors for observation under the microscope. In order to stain the tumors, I first needed to de-stain the leaves (remove the chlorophyll). I cut samples of leaf tissue containing tumors from my plants (Figs. 19, 20). I then placed 5.0 mL of 2:1 ETOH:Acetic Acid via plastic pipette into a large glass petri dish containing my leaf (Fig. 21). I sealed each dish with parafilm and let them sit over night (Fig. 22).
After observing the plants, we needed to stain the tumors for observation under the microscope. In order to stain the tumors, I first needed to de-stain the leaves (remove the chlorophyll). I cut samples of leaf tissue containing tumors from my plants (Figs. 19, 20). I then placed 5.0 mL of 2:1 ETOH:Acetic Acid via plastic pipette into a large glass petri dish containing my leaf (Fig. 21). I sealed each dish with parafilm and let them sit over night (Fig. 22).
 |
| Fig. 19 Leaf of SQ/Um 9/19 exhibiting tumors. |
 |
| Fig. 20 Leaf of my inoculated corn plant exhibiting tumors. |
 |
| Fig. 21 2:1 Ethanol:Acetic Acid solution used for de-staining the chlorophyll form diseased leaves. |
 |
| Fig. 22 Each leaf soaking in the ETOH:Acetic Acid solution. |
After allowing my leaves to de-stain for approximately 22
hours, I washed the leaves in water and ETOH. I then placed the larger leaf
(from SQ/Um 9/19) back into its glass dish and coated it with 0.1% Trypan Blue
in Lactophenol (Figs. 23, 24). Because my second leaf (from last week’s
inoculation) was much smaller than the first and I was trying to conserve the
dye, I decided to place it inside of a 50.0 mL centrifuge tube with only 2
drops of the 0.1% Trypan Blue in Lactophenol (Fig. 25). I then allowed both
leaves to sit for approximately 1.5 hours in this mixture.
 |
| Fig. 23 0.1% Trypan Bluw in Lactophenol used to stain the tumors of diseased leaves. |
 |
| Fig. 24 Leaf of SQ/Um 9/19 soaking in 0.1% Trypan Blue in Lactophenol. |
 |
| Fig. 25 My inoculated corn leaf soaking in 0.1% Trypan Blue in Lactophenol. |
After this time period, I mounted each leaf in a drop of
Lactophenol (Fig. 26) and observed the tumors under the microscope. The Trypan
Blue stained the cells of the tumor blue (Figs. 27-29), as well as other areas in
the leaf (Fig. 30).
 |
| Fig. 26 Lactophenol used to mount leaves on clean glass slides. |
 |
| Fig. 27 Stained tumors and other portions of my inoculated corn leaf at 10x magnification. |
 |
| Fig. 28 Stained tumors of SQ/Um 9/19 leaf at 10x magnification. |
 |
| Fig. 29 Stained tumors of SQ/Um 9/19 leaf at 10x magnification. |
 |
| Fig. 30 Stained areas of SQ/Um 9/19 which did not contain tumors (10x magnification). |
Neurospora Crosses
It was apparent after observing my Neurospora cross plate from the previous week that I had failed to
culture one of the most easily culturable fungi known to man (Fig. 31). Not
only had I not crossed SMRP-10 and SMRP-11, they appeared not to have grown at
all. :*(
 |
| Fig. 31 My failed Neurospora cross attempt. Little to no growth of fungus on the plate. |
In order to make-up for this failure, I tried the cross
again, and this time with all of the available mating types (Fig. 32). Using the SC
Mating Media, I made the following crosses:
·
SMRP110xSMRP-11
·
SMRP110xNCAL021-1 (I made two of these)
·
SMRP110xCSP-1-CH
 |
| Fig. 32 The four Neurospora crosses after being parafilmed and placed inside a plastic shoebox for storage. |
There are a couple of reasons I can think of for why my
crosses (and inoculations) did not work the first time. First, I may not have
cooled my probe (by sticking it in the agar after flaming) before collecting
spores from the culture. This may have killed the spores on contact, meaning
that I could have tried to inoculate my plate with dead spores. Second, if I
didn’t kill the spores, then I may not have inoculated with the appropriate
amount of spores. I was very cautious about not getting too much material the
first time I tried the cross. In doing the second series of crosses, however, I
made sure to cool my probe and use much more material for my inoculation.
Here’s to hoping that it worked.
Blogs
We had a spot-check on our blogs today; I got a 4/5. I usually try to update this thing before each lab, but this week I was not able to do this. I will try to be more consistent with updates. Also, I will make a conscious effort to have a more logical flow.
We had a spot-check on our blogs today; I got a 4/5. I usually try to update this thing before each lab, but this week I was not able to do this. I will try to be more consistent with updates. Also, I will make a conscious effort to have a more logical flow.
Unknowns
I would like to update Dr. Shaw and Dr. Ebbole on my
unknowns project. I have spent the whole semester up until last week writing my
thesis and preparing my defense. Because of this, I wanted to wait until after
I defended to start my unknowns project. I realize that I have waited a long
time to begin this, but I literally had no extra time in the first part of the
semester. By no means am I using this as an excuse: I signed up for my courses
this semester knowing that I would be defending. I just wanted to let you know
the reason you haven’t seen any blogs regarding my unknowns. You will see an
update on my unknowns shortly.
Conclusion
All in all, I feel pretty comfortable with the conidiating Hyphomycetes and the procedures that we have used to inoculate, observe, and stain the corn. I am a little discouraged that my Neurospora crosses did not work, though. There are a couple of reasons I can think of to explain this. First, I may not have cooled my probe (by sticking it in the agar after flaming) before collecting spores from the culture. This may have killed the spores on contact, meaning that I could have tried to inoculate my plate with dead spores. Second, if I didn’t kill the spores, then I may not have inoculated with the appropriate amount of spores. I was very cautious about not getting too much material the first time I tried the cross. In doing the second series of crosses, however, I made sure to cool my probe and use much more material for my inoculation. Here’s to hoping that it worked. Or, I could just be really bad at inoculations. This is definitely something I will be practicing until I get it right. I guess I won't be a microbiologist or a mycologist when I grow up.
Charity


